Simple custom express-like Middleware pipelines


Node’s Express framework has a really good way of enforcing middleware like ‘pipelines’ that allow you to organise and compose your code through the middleware pattern. You’re meant to provide the set of middleware functions that would be sequentially executed from the beginning to the end creating what I here refer to as a middleware pipeline.

Below I’ll give a very simplified way of achieving that type of behaviour, by using a bit of TypeScript.

First you’ll need a higher order function that would be responsible for implementation of a middleware based pipeline processing. The goal is to provide it with a list of middleware functions that would be sequentially executed (similar to express array based middleware):

///////////////////////////
// Defining the middleware
///////////////////////////
const middleware = (functions: Function[] = []): Function => ( ...args) => functions.forEach(fn => fn.apply(this, [...args]));

Than you could set up the data (sequence of middleware functions as well as additional data to be used as context/arguments for each individual middleware function) to test it with:

///////////////////////////
// Using the middleware
///////////////////////////

// Test data to be used as context/arguments for all middleware functions
const req = {type: 'request', data: {}};
const res = {type: 'response', data: {}};

// Definition of custom middleware functions
const setLikes = (...args: any[]) => args[1].data.likes = 0;
const increment = (...args: any[]) => args[1].data.likes++;
const log = (...args: any[]) => console.log.apply(console, args);
const preLog = (...args: any[]) => log(`Before executing function!`, args);
const postLog = (...args: any[]) => log(`After executing function!`, args);

// Compose middleware pipeline by providing a sequence of middleware functions
const muttablePrePostLogMiddlewares = middleware([setLikes, preLog, increment, postLog]);

// Execute above created middleware pipeline on provided dataset
muttablePrePostLogMiddlewares(1, req, res);

And above would cause the following output to be produced:

//////////////////////////
// Produced Output
//////////////////////////
// Before executing function! [1,{"type":"request","data":{"likes":0}},{"type":"response","data":{}}]
// After executing function! [1,{"type":"request","data":{"likes":1}},{"type":"response","data":{}}]

There are many things you could add there in addition to the simple implementation from above. Just as an e.g. if for some reason you would need to have the results of your middleware pipeline execution, per middleware function, you could make sure that your middleware function definition from above returns the middleware pipeline result just by changing forEach to map operator like provided below:

///////////////////////////
// Defining the middleware
///////////////////////////
const middelware = (functions: Function[] = []): Function => ( ...args) => functions.map(fn => fn.apply(this, [...args]));

// ...

///////////////////////////
// Using the middleware
///////////////////////////
// Execute above created middleware pipeline on provided dataset
const middlewarePiplieResult = muttablePrePostLogMiddlewares(1, req, res);
console.log(`Result of middleware pipeline execution: ${result}`);

//////////////////////////
// Produced Output
//////////////////////////
// Result of middleware pipeline execution: 0,,0,

“And that’s all I have to say about that.”
Recreating Github in a SPA way


This blog post is exposing the video demoing the new SPA based application built on top of Angular.js that I’ve been developing as a weekend project. The app is completely javascript based application with the purpose to replicate GIthub’s web client leveraging Github’s REST based API.

There are couple of special touches that I did which distinguish it from the Github itself:

  • completely different architectural approach (SPA based app driven by the REST API) than the one Github uses (full page reload),
  • completely responsive (optimized for desktops/tablets/mobiles),
  • different approach in presenting repository details (folder/file hierarchy).


Enjoy the video and please feel free to provide the feedback! Hope to share it with you soon…


Adding i18n support to your Angular Applications


For adding i18n support to your Angular.js based applications you could find angular-translate module to be very useful. This is really good module to use for that purpose.

This post is about using that module as a base and going a bit further by encapsulating all i18n related logic completely into its own separate module with minimal impact to your application’s config method.

About the module

You can find the source code for the module on this repository. Also the example small application using it can be found here.

In order to use url.i18n in your applications you will first need to downlaod and add angular-translate.js as a dependency to your application.

I am usually using bower, so for me it required this 2 things: 1) Adding following line to my bower.json file:

"angular-translate": "~2.0.1"

After that you should be including the library specific files to your index.html page (or whatever root page of your project). This would also mean that you would have copied the content of lib folder within a specific location in your application (that specific location depends on your application structure and the way you are laying out your modules).

    <script src="../lib/index.js"></script>
    <script src="../lib/constants.js"></script>
    <script src="../lib/providers/translation-provider.js"></script>
    <script src="../lib/lang/sr.js"></script>
    <script src="../lib/lang/de.js"></script>
    <script src="../lib/lang/en.js"></script>

I like my modules to have clear files separation hence you’ll see everything in its own file. I find this especially usefull for a large teams. But you could easily use only 1 file and concatenate all my files within it. I usually use grunt for building so I have separate tasks for doing that for production versions.

The next step is to configure your angular.js application (main angular module) to use url.i18n. This means you should add url.i18n as a dependency to your application – something like this:

angular.module('myApplication', ['url.i18n'])

With this you’re good to go with using this module for i18n support within your application. The only thing to do is change your templates and global controller to be able to switch languages. Check out example folder for an example (deployed here).

If you want to set a specific language as a default language you can easily do that by adding following line to your main application’s config handler function (see example for reference):

TranslationProvider.setPreferredLanguage('de');

Your company needs help from an expert?  Feel free to contact me.


Links

Building single page apps with require, backbone, Flickr API …


Building single page apps might implicate a lot of tools and technologies. In this post I have provided you with a small single-page application that is consuming public Flickr API service (json based). It renders a list of items retrieved based on the tag search, which are linked to an internal details page. You will find out how you might be using frameworks like

  • backbone.js to try to structure your applications a bit better,
  • require.js to modularize your application code and perform dependency management,
  • grunt.js to enhance your build process,
  • compass  for css preprocessing
  • karma to help you automate your tests running
  • jasmine to help you write your javascript tests

About the application

The application’s requirements can be found within README.md file, but here are some of the things to be done:

  • App consumse a Public JSON API Feed (documentation) and displays the resulting data according to the wireframes (Wireframes-spec.pdf).
  • Should function as a sinigle-page app (SPA)
  • Use responsive techniques to ensure it works on a range of devices
  • Use Backbone for adding a structure to the application (MVC like style).
  • Implement search box where text entered is matched against public Flickr API tags
  • Provide build process for generating production-ready code

Development Process

In the following screencast I will try guiding you trough the app and its source code and explain some implementation specific details.   The video quality is not good at all, but hey you can get everything for free! 🙂 Hope you’ll find it helpful!

Outro

There is so much more that can be improved and implemented here but it is outside the scope of this tutorial, whose only purpose is to help you wrap your head around the ways of configuring these technologies and using them in your everyday work and process of building single page applications.

Your company needs help from an expert?  Feel free to contact me.
 

Links

Playing with Raphael.js (1) – Intro


Raphael.js is a wonderful small library to help you playing with vector graphics in JavaScript.

In this series of posts I’ll try to explain how you can improve your Raphael.js custom code by extracting parts of it into Raphael’s primitives that can be later instantiated and used in your or other people projects.

About the problem

Its a good practice to always have a good start when developing things. By that I mean it always good to take a bit more time to consider how to architect the solution for the problem you are fixing so that you can later easily refer to it and maybe potentially reuse it in some of your further projects. Doing so usually brings up a subject of introducing OO design and modularization to your applications.

I wanted to show you how you might improve your Raphael.js code by factoring out a thing that might be reusable in a separate Raphael component (or primitive) that can be later easily used anywhere by simply including and instantiating it.

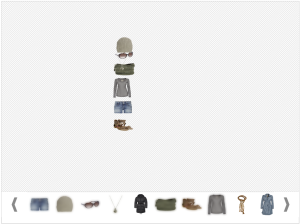
The problem I made up today is ‘Outfit Editor’. Imagine that you have a need to build an online outfit editor in javascript (svg lets say), that would enable users to select each individual outfit item and bring it ‘to the stage’ where they might edit it or perform various things with it (example see how that particular item fits in with the remaining items selected by the user).

What we would ideally want to have from our Outfit Editor is:

  1. That it offers a list of items to select from in a separate section/area (‘Carousel‘)
  2. That we could pick up each item and bring it to the ‘Editing Stage‘ – place where we bring in all the items that we like, so that we can combine them, see how they fit together, change tier sizes, dump them if we don’t like them…
  3. That each item should be draggable.
  4. Within the Carousel we should be to able to visually distinguish outfit editor items that are already selected
  5. Items brought to the Editing Stage – Active Items, should be restricted to only be dragged within the Editing Stage so that they are still partially visible when we try to drag them out.

Here is the image of how our final thing will look like:

URL-outfit-editor-preview

We will touch on following technologies in this post:

Sit tight and please send some feedback ( motivate me to do more 😉 )!

HTML5 Drag&Drop demo


Drag&Drop API is one of many great things that new HTML5 specs offers.

In this post I have provided you with an example of how you might use that API to create a very basic portal.

About the demo

To see the demo mentioned above, visit this page.

The file dealing with DnD API is called urldnd.js. This file contains a definition of a Portal (URLDnD) class, which attaches Drag&Drop features to registered portal portlets.

Portlets are draggable and may be dropped within each of the portal columns. Portal columns are the containers for protal’s portlets and to be registered as a drop zones I had to add event listeners to certain DnD events. One of the most important handlers is registered in this line:
column.addEventListener('drop', dnd.handleDrop, false);

This is how you make a column react on each portal drop event. So whenever portal is dragged over a column, and dropped inside of it dnd.handleDrop function is executed and it contains the logic of removing the portal from the previous container (column) and appending it to the new targeted container (column).

The moment we start dragging the portlet, the dragstart event would be triggered so in order to catch that event and attach the minimal amount of data to it I am registering the handler to that event in the following line of code:
portlet.addEventListener('dragstart', dnd.handleDragStart, false);

The dnd.handleDragStart function is the place where I am taking the dragged portlet’s id and storing it within the event in the following line of code:
e.dataTransfer.setData('text/plain', this.id);
The reason for doing that is simple – so that at the end, when the portlet gets dropped I could grab the portlet that was dragged and manipulate it accordingly. The above line shows how you might attach some extra information to the event itself.
The code for the demo is very intuitive and straightforward.
There is so much more in relation to the Drag&Drop API that is outside of the scope of this demo and tutorial, but if this can help you get started in any way than my mission is accomplished. 😉
Good luck!

Links

URL Express CRUD Library


A few days ago, as a result of playing with Node, I have created and published an open source node based library called url-express-crud.

The main library objectives are:

  • Quickly expose basic CRUD operations in the application for a concrete model (resource).
  • Make it as flexible as possible, enabling clients (developers) to configure it based on their needs and desires (override resource related templates, make route handlers configurable, …).
  • Make it support content negotiation.

The main motivation for creating this library was to make it possible to quickly provide basic boilerplate CRUD operations for models (resources) that almost every app needs and all with certain level of flexibility in terms of customization that might be required.

However its important to note that the library is its very early phase and there’s a lots of things still to be implemented…

Installation

Just require the library as a dependency in your project’s package.json file:
"url-express-crud": "*"
Than just require it within your project file:
var urlCrud = require('url-express-crud');

And you can start using the library.

Usage

In order to help you understand how to use the library I have created a demo application.

The example application’s source code can be found in the separate github repo located here.

I’ve record a short screen-cast of me going though the process of using the library and creating the example application mentioned above. For now in order to provide you with the video pls contact me here, but if you are patient it will be soon uploaded to this blog.

Links

Playing with google maps api


Few months ago I had a need for building a form that has some address related logic built into it.

The aim was enabling the users to quickly fill in their address form fields, in that manner that they would be interpreted correctly for the persistence layer, meaning all of the address components would be extracted correctly (like country region, city, ….) and placed in appropriate input fields.

So I was playing a bit with the Google Maps API and here is what I ended up with in the initial phase (a thing that I can share).

Please note that the only purpose of this tutorial is to try to expose some code that might hopefully help you learn some parts of that API and maybe help you getting some idea how to address your own problems (in this area).

Brief Code overview

index.html page contains all the html markup that the demo needs.

You will find that I’ve been using Twitter’s Bootstrap framework for styling the demo page.

The JavaScript dependencies are:

  • Google Maps API v3:
  • jQuery:
  • Twitter Bootstrap library:
  • My custom utility functions for dealing with Google Maps API responses and address form fileds:
  • The main demo script, bootstrapping everything:

Demystifying source files

I have created documentation for my custom JavaScript files and you can find them here:

Links

Welcome to my world!


Welcome to my personal blog!


My name is Uroš Lates and I am Senior Web Developer. You will be able to find more information about me on my personal website.

This blog will be mostly oriented towards web developers. You should be able to expect posts related to web programming,  development related tutorials and similar content.

Hope you’ll find it helpful!

So stay tuned! 😉


If you need any help or services that I can provide feel free to contact me!